Overview
This type of connector is used to synchronize both devices and detailed tenant data between the Xyte and Partner cloud.
If End Customers create accounts on your cloud, build up tree of locations and devices, this integration allows to sync both the device data and re-create the current End Customer's tree structure and device inventory in Xyte.
User Flow
This is the recommended from for a User connecting to the OEM's Cloud and adding the Xyte integration.
- User logs into the OEM cloud
- User selects the add "Xyte Integration" option
- The system shows the user helpful information on how to
- Sign-up or sign-in to the Xyte Cloud
- Obtain an API key
- The User copies the API key and enabled the integration
- The C2C integration registers devices with the Xyte cloud and starts sending data (telemetries, etc)
- The C2C integration copies the "space" (location/container/etc) structure to the User's Xyte tenant via the "Space Management APIs"
- The C2C integration assigns devices to the User's Xyte tenant
Implementation
Setup Partner Portal
-
Obtain credentials to access your Xyte Partner portal at https://partners.xyte.io
-
Navigate to Model Management https://partners.xyte.io/models
-
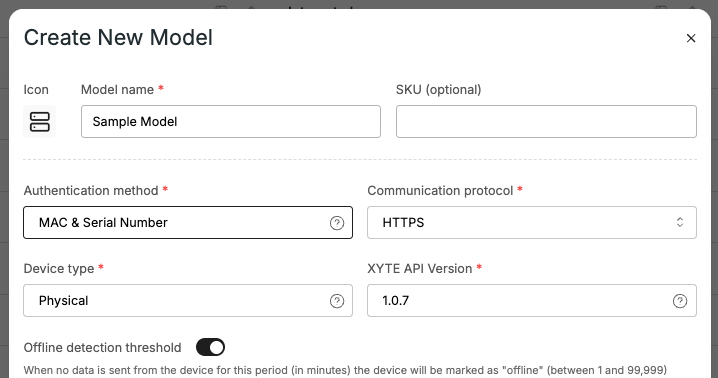
Click "Add Model" to create your first model (SKU)
-
Fill in "Model name" and change "Authentication method" to "MAC & Serial Number
-
Copy the "Model ID" (for later)
-
Go to the "Hardware Keys" tab and copy the first key (for later)
Register Device
Use the Register Device API:
- device_model - Model ID from step #5 above
- hardware_key - Hardware Key from step #6 above
- mac - MAC address of your device
- sn - Serial number of your device
- firmware_version - Semver based firmware version of your device
curl https://entry.xyte.io/v1/devices \
      -H "Content-Type: application/json" \
      -X POST \
      --data '{"device_model":"755ab4a0-37b1-4bf0-b3e4......","hardware_key":"4fa553d3-e88e-4e0a-a6......","mac":"8E:00:00:00:00:06","sn":"1000","firmware_version":"1.1.1"}'
The returned data should be in a format similar to:
{
    "id": "19f85812-ee1a-4732-a115-f3b9afdadeab",
    "access_key": "fa5549605d5f7559257b1bd2055d730b",
    "hub_url": "https://eu-1.endpoints.xyte.io",
    "hub_url_static_cert": "https://eu-1.cssl.endpoints.xyte.io",
    "mqtt_hub_url": "mqtts://mqtt-us-1.endpoints.xyte.io:8883"
}
Copy and save the "id", "access_key" and "hub_url" fields for the next step.
Send Telemetries
The device should update the server on its current state, both periodically (30-60 seconds) or when a change happens.
Use the Send Telemetry API:
- Use the "hub_url" from the above step, as the target URL
- Use the "id" from the above step in the URL between the
/device/and/telemetryparts - Use the "access_key" from the above step as the value to the "Authorization" header.
- The data contains the "status" of the device and a "telemetries" key containing a flat key/value mapping of all data points to sync to the cloud.
curl https://eu-1.endpoints.xyte.io/v1/devices/19f85812-ee1a-4732..../telemetry \
      -H "Content-Type: application/json" \
      -H "Authorization: fa5549605d5f7559257b...." \
      -X POST \
      --data '{"status":"online","telemetries":{"cpu":30,"input":"hdmi","muted":true}}'
Setup End Customer Portal
For testing a "Lab" tenant is automatically created on the End Customer Portal, you can access it by visiting https://app.xyte.io and using the same credentials as the Partner Portal credentials from step #1 in "Setup Partner Portal".
Visit the lab and:
- Navigate to "Settings" (left side menu)
- Navigate to API Keys
- Click "Create API Key", give it a name and copy the key for the next steps.
Create Space
Use the Create Space API:
- Use the "api key" from step #3 above as the value to the "Authorization" header.
- Select a name for the new space you want to create
curl --request POST \
  --url https://hub.xyte.io/core/v1/organization/spaces \
  --header 'Authorization: 365315e276c3056a01.......' \
  --header 'content-type: application/json' \
  --data '{
  "name": "My location"
}'
The returned data should be in a format similar to:
{
  "id": 100000,
  "name": "My location",
  "parent_id": 99999,
  "config": {
    "img": null,
    "priority_factor": 0,
    "inherit_location": true,
    "temperature_units": "celsius",
    "inherit_priority_factor": true,
    "inherit_temperature_units": true
  }
}
Copy the "id" of the generated space for the next step.
Customers vs Spaces
Since the Xyte cloud supported the concepts of multiple Customers being managed in a single End Customer Portal, the above code will generate a new "Customer" as no parent_id parameter was provided to the "Create Space API".
A full implementation of the integration, should use the Get Spaces API to retrieve the list of top-level spaces and ask the User first to select under which Customer space to import the devices from the OEM's cloud. And use that Customer space as the parent for all sub-spaces.
In our sample we are actually creating a Customer type space, which is a sub-tenant. As such, devices and spaces synced between the clouds will not be movable to other Customer spaces.
Assign Device
Now we can assign the device that was registered during the "Register Device" step to the User's Xyte tenant under the space created in the "Create Space" step.
Use the Claim Device API:
- Use the "api key" from step #3 of "Setup End Customer Portal" as the value to the "Authorization" header.
- space_id - The "id" of the space returned during the "Create Space" step
- mac - The MAC address of the device from the "Register Device" step
- sn - The serial number of the device from the "Register Device" step
- name - Any friendly name to give the device
curl --request POST \
  --url https://hub.xyte.io/core/v1/organization/devices/claim \
  --header 'Authorization: 365315e276c3056a01.......' \
  --header 'content-type: application/json' \
  --data '{
  "name": "My nice name",
  "space_id": 100000,
  "cloud_id": "fJxbx5zb5Sz4m0.........."
}
Verify
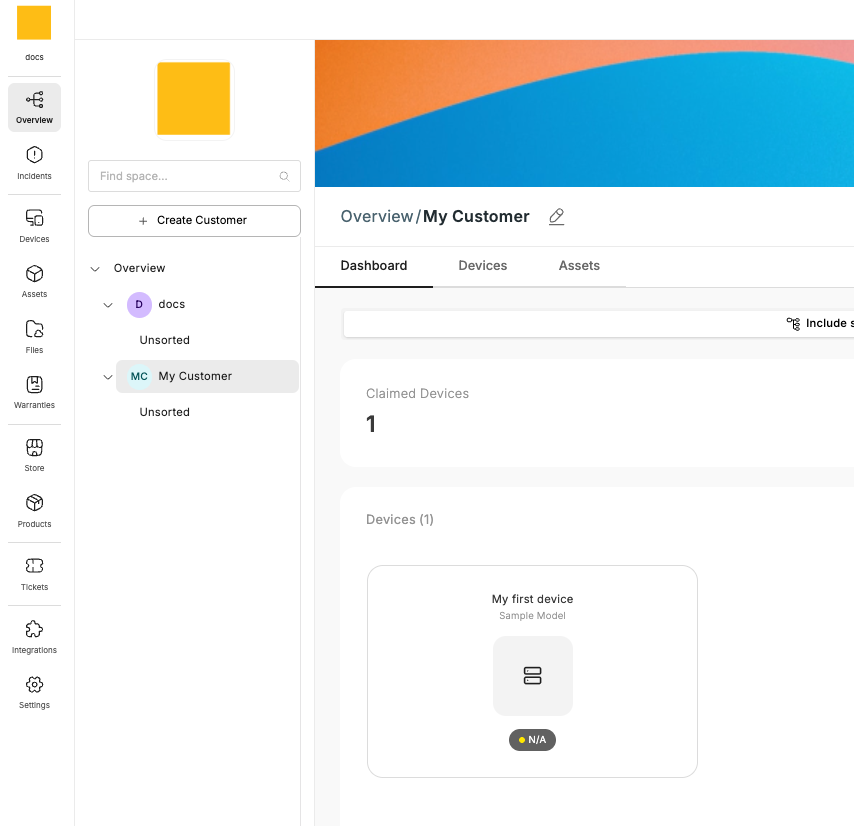
Visit your End Customer Xyte Portal at https://app.xyte.io
-
Navigate on to "Overview" (right side menu)
-
Select the Customer space created during the "Create Space" step
-
You should see the claimed device
-
Click the device and navigate to "State" to see the data sent during the "Send Telemetry" step.

The Partner Portal can be used to generate visual widgets to display the information in a user friendly way.